If you've made it this far, you have a fresh Ubuntu EC2 instance running on your shiny new AWS account. Amazing!
By the time we finish this step, you'll have Grav up and running, and you'll even be able to visit it from your browser. How exciting!
Accessing our Ubuntu instance
So now that your EC2 Ubuntu instance is running, we need to access it!
There are a few ways we can do this, the primary manner will be via an SSH connection using your .pem key that we downloaded in the last step.
But for now, we will connect via the AWS console.
1) First, click on your instance ID to go in to the instance summary for your Ubuntu server.
2) Next, click connect at the top right.
3) Leaving everything default, click the connect button.
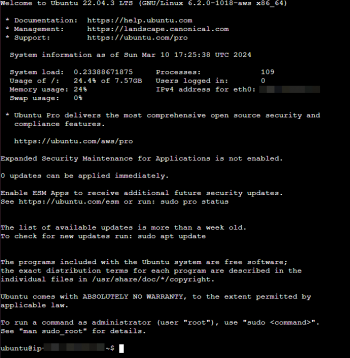
This will establish a connection and you will be greeted by something that looks like the following image. This is your Ubuntu CLI and this is how you will interact with your server from now on!

A brief introduction to Ubuntu
Before we get started, if you have never used a CLI based operating system before, then some of this might be a little confusing. Not to worry, however, we will now cover the basics of using and navigating our operating system, before doing anything else!
What is Ubuntu Server?
Ubuntu is the operating system that runs on your computer, just like Windows or Mac, however Ubuntu is a version of Linux that aims to be user friendly, and is also free. You will primarily navigate Ubuntu server in the same way that you'd navigate a CLI (Command Line Interface). Instead of clicking on icons and navigating through windows, you will use some basic commands to get around the operating system without the need for a GUI (Graphic User Interface).
The basic Ubuntu commands you'll need to know for this step
Here are some of the basic Ubuntu commands that you'll be using in this guide, and their purpose to this guide.
ls
The ls command simply shows you all of the files and folders in the current directory. This will help you see what is currently available to you, and where you can navigate.
cd
The cd command is used to navigate between folders in your file system. Once you know the name of the folder you want to navigate to, simply use the command cd foldername. Optionally you can use cd .. to navigate back up one directory, to where you were before.
sudo
sudo is a powerful command that allows you to perform actions that you otherwise don't have the permissions to do. Never use sudo to perform a command you don't fully understand, just to be safe!
apt
apt stands for Adanced Package Tool. This is what we will use to find, update, install, and remove packages from your Ubuntu instance.
mv
This is a command used to move a folder from one place to another. No different to dragging and dropping it in to a new folder when you are using a GUI.
Using these commands you will be able to do everything we need to do in this stage of the guide. However in step 4, we will be introducing some more exciting commands!
Installing the required packages.
Now that we know how to navigate our Ubuntu instance, it's time to install the required packages. Remember that Grav is a LAP CMS, and now that we are on Ubuntu we have already gotten the first requirement, Linux!
Before we install any packages, we need to make sure we're working with the most up-to-date builds. First we will run:
sudo apt updatewhich will update our Ubuntu server's list of available packages. Next we will run:
sudo apt upgradeand type Y when prompted. This will update all packages that we have installed to their latest versions.
If you received any large purple errors in this process, they can be fixed by running:
sudo rebootand waiting 5 or so minutes for your instance to reboot. Should you need to do this, you can re-access your terminal by following the steps above!
Now we're ready to begin installing Apache webserver!
Installing Apache
Now for the A in LAP, Apache!
Apache is a web server that handles HTTP requests and serves the required content. It will be in charge of knowing what to deliver to our user, and then delivering it.
Let's get started by running our first install command, and typing Y when prompted:
sudo apt install apache2This command uses superuser permissions to install apache2 by using the Advanced Package Tool.
Next we need to enable the Apache2 rewrite module. We can do so with the following command:
sudo a2enmod rewriteThe rewrite module is a powerful tool used by Apache to rewrite dynamic URLs to be more user friendly. This will make our Grav site look and feel even easier to navigate!
Next, we need install the SSL module. This module will allow Apache to eventually serve web pages over an encrypted Secure Socket Layer connection. If you've ever noticed the little padlock in your URL bar, that means your connection is secured with SSL. This will ultimately be quite important to making sure your content is secure, and your users are safer!
We can install the SSL module with the following command:
sudo a2enmod sslAnd finally we need to configure Apache to allow overrides, so that Grav can perform the required functions to serve our flat files to the user! This next command looks a little complicated, but we will break it down.
sudo sed -i '/<Directory \/var\/www\/>/,/<\/Directory>/ s/AllowOverride None/AllowOverride All/' /etc/apache2/apache2.confThis command uses the sed (stream editor) command with the -i modifier to modify a file in place. The file we are modifying is the apache2.conf config file. The change we are making is to change AllowOverride from None to All.
Hopefully that makes sense! If not, don't worry, as long as you have run this command, Apache is now all set up!
Now we will restart Apache2 to apply our new changes, by running:
sudo systemctl restart apache2and voila! We are done!
On your AWS EC2 instance screen, you will be able to find your Public IPv4 address. Navigate to your new Apache server by typing this in to your web browser:
http://<your IP address>:80 e.g. http://1.234.567.89:80
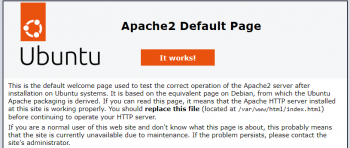
You should have a page that looks something like this, meaning Apache2 is now set up and serving content!

Installing PHP
Now for the P in LAP. PHP is a server side programming language that can perform modifications to HTML before delivering it to the user. It is an essential part of running Grav and ensuring the content is delivered properly!
First, let's install PHP and the extensions required by Grav:
sudo apt install php php-curl php-xml php-simplexml php-yaml php-opcache php-ctype php-mbstring php-zip php-apcu php-gdThis command will use the Advanced Package Tool to install PHP and the extensions it needs to work on Grav.
Finally we need to restart Apache2 once more to apply our new PHP settings.
sudo systemctl restart apache2Now we want to test whether our PHP installation is working, we can do this by using the phpinfo() method in a .php file, and then asking Apache to serve that page to us.
First let's make the phpinfo.php page by using this command:
echo "<?php phpinfo(); ?>" | sudo tee /var/www/html/phpinfo.phpThis will create a new file named phpinfo.php on our Apache server, and fill it with the contents of the phpinfo() method.
Now we can test if PHP is working by navigating to:
http://<your ip address>/phpinfo.php e.g. http://1.234.567.89/phpinfo.php.
You should see a page that looks a little something like this. If so, then we're ready to move on to installing Grav CMS, finally!!

Installing Grav
This is the part we've all been waiting for! Finally getting Grav CMS installed! Before doing anything else, let's make sure we're working from our Apache2 HTML directory, as this is where the files we download will need to be stored!
cd /var/www/htmlNow let's go ahead and download Grav from the getgrav host!
sudo wget https://getgrav.org/download/core/grav/1.7.44 -O grav.zipAs I write this, version 1.7.44 is the latest version of Grav. You can either modify this command to the latest version, or wait until a little bit later where we will manually update it to the latest version!
Next we need to unzip the Grav ZIP file, we can do this by performing these two commands:
sudo apt install unzipThis installs the Unzip package to Ubuntu.
unzip grav.zipThis unzips the Grav files to our html directory, and may take a few minutes to complete.
Now if you run the ls command you will see that our Grav files sit inside a grav folder. We want to move them out of that folder, to sit in our html folder. To do that, simply run these two commands:
sudo mv grav/* .
sudo mv grav/.* .
These commands will move the files from the grav folder to the html folder that we are currently working in.
Now let's clean up a little bit, by deleting the grav folder and our downloaded grav.zip.
sudo rm -rf grav grav.zip(Always be very careful when using rm -rf commands. They can be permanently destructive. Never run them unless you fully understand the command!)
Next we need to install the Admin plugin for Grav. This will let us manage the Grav settings from a web panel! Very handy!
sudo bin/gpm install adminAnd finally we should update Grav to the latest version.
sudo bin/gpm selfupgrade -fWe're nearly done! Now we just need to set up some permissions to let Grav make the modifications it needs to our files, and we'll be ready to rock!
Understanding Ownership
We are about to use some new Ubuntu commands, being chown and chmod. Simply put, these commands will modify who can read, write, and execute the files that are modified.
Grav performs its actions using the www-data user in the www-data group. So we need to grant this group and user the permissions required to make modifications to the file structure. Remember that Grav uses these files directly to serve content to the user, so it is very important it has the permissions required to do so!
Giving Grav the correct permissions
First, ensure that we are working in the Apache2 html directory
cd /var/www/htmlNext, let's change recursively change the owner of this directory to be www-data. Recursively means it will affect all files in this folder, all folders in the folder, all files within those folders, etc. Absolutely everything contained within the html folder will now be owned by www-data, allowing it make the necessary changes!
sudo chown -R www-data:www-data .Now we will change the permissions on all of these files to be 664, meaning they are both readable and writeable by www-data, and readable by everyone else.
sudo find . -type f | sudo xargs chmod 664And finally we will make it so that all newly created files will inherit the permissions of the folder they are contained within.
sudo find . -type d -exec chmod g+s {} +Finally, we simply need to restart Apache2 once more, and our Grav site will be ready to use!
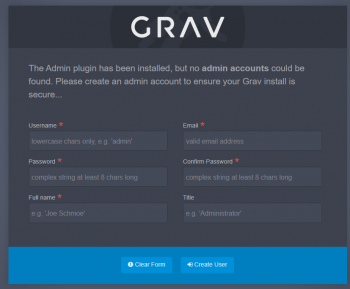
sudo systemctl restart apache2Navigate to your IP address in your browser as before, and you should be greeted by this page!

Congratulations! Your Grav site is now set up! Go ahead and create your user, and begin looking around Grav!
We're technically done here...
Well, that's it! This is what the guide initially set out to achieve. You now have your own self hosted Grav CMS blog! You can begin choosing themes, writing posts, and pushing your own content out there in to the world!
However, I don't feel like this should be the end of the guide, really. There's so much more we need to do:
- Get our domain name working
- Set up SSL for a secure connection
- Learn how to use the many powerful features of Grav
- make our blog look even more professional
- So, so, so much more!
As such, we will be continuing with some of these and more in the next few articles! So if you're interested in taking your Grav journey one stop further, stick with us... Until next time!
